Wi-Fi security cameras offer peace of mind and real-time monitoring, but proper installation is key to maximizing their potential. Follow this professional step-by-step guide to set up your system effortlessly.
- Carefully unbox your Wi-Fi camera system and verify all components are present. This typically includes:
- Camera(s)
- Mounting hardware
- Power adapter(s)
- Quick start guide
- Check for any physical damage or defects before proceeding.
Step 2: Plan Your Camera Placement
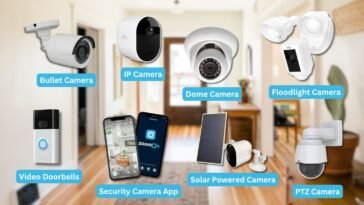
- Identify Key Areas: Place cameras to cover vulnerable spots like entrances, driveways, and blind corners.
- Ensure Strong Wi-Fi Signal: Use a Wi-Fi analyzer app to test signal strength at the intended locations.
- Consider Lighting: Avoid direct sunlight or areas prone to glare for clear visuals.
- Power On the Camera:
- Connect the camera to a power source or insert batteries (for wireless models).
- Download the Mobile App:
- Install the manufacturer’s app on your smartphone or tablet for configuration.
- Pair with Wi-Fi:
- Follow the in-app instructions to connect the camera to your Wi-Fi network. Ensure your Wi-Fi password is handy.
Step 4: Test the Camera’s View and Connectivity
- Use the app to adjust the camera’s angle and zoom. Ensure a clear view of the monitored area.
- Test the live feed to confirm smooth video streaming without connectivity interruptions.
Step 5: Securely Mount Your Camera
- Mark Drill Points:
- Use the camera’s mounting plate to mark drill points.
- Drill and Install:
- Drill holes and secure the mounting plate using screws and anchors.
- Attach the Camera:
- Fasten the camera to the mount and ensure it’s firmly secured.
Step 6: Optimize Camera Settings
- Adjust Sensitivity: Set motion detection sensitivity to avoid unnecessary alerts.
- Configure Notifications: Enable push notifications or email alerts for real-time updates.
- Set Recording Preferences:
- Choose between cloud storage or local storage (if your camera supports SD cards).
Step 7: Perform a Final System Test
- Simulate movement in the camera’s range to ensure motion detection works as expected.
- Test night vision if applicable by checking the feed in low-light conditions.
Step 8: Maintain Your Camera System
- Regularly Clean Lenses: Prevent dirt or debris from obstructing the view.
- Update Firmware: Ensure your camera’s firmware is up-to-date for the latest features and security patches.
- Check Power and Connectivity: Periodically inspect power sources and Wi-Fi connections.
Conclusion
Installing a Wi-Fi security camera system doesn’t have to be overwhelming. By following these steps, you can ensure a professional-grade setup that enhances the safety of your home or business.