Here is a complete guide of how to connect cctv camera on laptop using all major brand secueity cameras avaibale here on Mygss.pk
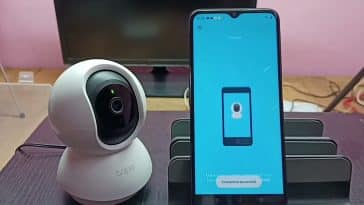
How to Connect V380 CCTV Camera to a Laptop (Windows)
1. Power the Camera:
Plug your V380 camera into a power source.
- Wait until the camera powers up and starts scanning (you’ll usually hear a voice prompt).
If not already connected:
- Install V380 Pro or V380 app on your phone.
- Connect your phone to the camera’s Wi-Fi hotspot (e.g.,
MVXXXXXX).
- Open the app → Add Device → Configure Wi-Fi.
- Enter your Wi-Fi name and password to connect the camera to your network.
- Download V380 for PC (Windows)
- Install and launch the software.
Step 4: Log In or Use Local View
- Open the software on your laptop.
- You can either:
- Login using the same account as your mobile app
- Or click “Local Login” to use without logging in
Step 5: Add the Camera
Method 1: Auto Search on LAN
- Click on “Device List” > “Search”
- The software will scan for cameras on the same Wi-Fi/LAN
Method 2: Manual Add
- Click “Add Device”
- Input:
- Device Name (any name you like)
- Device ID (found on the sticker under the camera or in the app)
- Username: usually
admin
- Password: your Wi-Fi camera password (or blank if not set)
Step 6: View Live Video
- Once connected, you’ll see the live video feed.
- You can also:
- Record video
- Take snapshots
- Adjust settings
How to Connect CCTV ICSee Camera to Laptop (Windows)
Step 1: Power On the Camera
- Plug your camera into a power source.
- Wait for the voice prompt or blinking light indicating it’s ready to pair.
- Download the ICSee or ICSee Pro app on your smartphone.
- Open the app → Tap “+” to add a device.
- Choose the appropriate device type (e.g., Wi-Fi Camera).
- Follow the instructions to connect the camera to your Wi-Fi.
- Once added, test live view on your phone first.
Step 3: Install ICSee for PC
Download the official xmeye for pc software (Click here to download)
- Install the software and open it.
- Go to Device Manager > Add Device Manually.
- Enter:
- Device Name: any name
- Serial Number (S/N): Found on the camera or in the ICSee mobile app
- Username: usually
admin
- Password: your camera/device password
- Click “OK” or “Add” and go back to the live view tab.
✅ You should now see your camera feed on your laptop.
Tips for Smooth Setup
- Make sure your laptop and camera are on the same Wi-Fi network (for LAN access).
- Use strong passwords for the camera.
- If remote viewing is needed, ensure the camera is properly added to your ICSee cloud account.
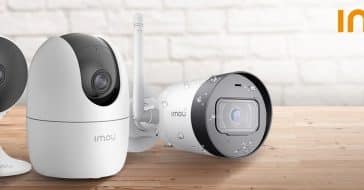
How to Connect IMOU CCTV Camera to Laptop (Windows)
Step 1: Power On and Set Up the Camera (via Mobile)
Before using it on your laptop, do a quick setup on your phone:
- Plug in your IMOU camera and wait for it to start up.
- Download the IMOU Life app on your phone (iOS/Android).
- Open the app and create an account or log in.
- Tap “+” to add a new device → Scan the QR code on the camera.
- Follow the steps to connect the camera to your Wi-Fi.
✅ Once you see the live feed on your phone, you’re ready for laptop access.
Step 2: Download and Install IMOU PC Software
IMOU provides official PC software called IMOU Life for Windows or SmartPSS (Dahua version).
Option A: Use IMOU Life for Windows
- Go to: https://www.imoulife.com/support/download
- Download IMOU Life (for Windows)
- Install and run the software
- Log in with the same IMOU account you used on your phone
✅ All your added devices will automatically sync — no need to manually add them. This is a complete guide of How to connect cctv camera on laptop
How to Connect EZVIZ CCTV Camera to Laptop (Windows)
Requirements Before You Begin
- A working EZVIZ camera (already set up and connected to Wi-Fi or Ethernet).
- Your EZVIZ account credentials.
- A Windows laptop with internet access.
- EZVIZ Studio software or the EZVIZ web portal.
Using EZVIZ Studio
Step 1: Download EZVIZ Studio
- Go to the EZVIZ official website. (Click here to Download)
- Navigate to Support > Download Center.
- Download and install EZVIZ Studio for Windows.
Step 2: Log In to Your EZVIZ Account
- Launch EZVIZ Studio.
- Click on the login button and enter your EZVIZ account credentials.
Step 3: Add Your Camera
- Click on Device Management.
- If your camera is already added to your account via the mobile app, it should appear automatically.
- If not, click Add Device and enter the serial number (usually found on the camera or packaging).
Step 4: View the Camera Feed
- Once added, go to the Live View tab.
- Select your camera to see the live video feed.
How to Connect Tapo CCTV Camera to Laptop (Windows)
Step-by-Step Guide: Connecting Tapo Camera to iSpy software.
- Open the Tapo app on your smartphone.
- Navigate to Camera Settings > Advanced Settings.
- Enable RTSP or ONVIF protocol.
- Create a Camera Account by setting a username and password. This account is separate from your TP-Link ID and is used for streaming.
2. Find Your Camera’s IP Address
- In the Tapo app, go to Camera Settings > Device Info.
- Note the IP address assigned to your camera (e.g.,
192.168.0.55).
3. Download and Install iSpy on PC
4. Add Your Tapo Camera to iSpy
- Open Agent DVR and click on Add.iSpyConnect.com+2Broodle+2iSpyConnect.com+2
- Select ONVIF Camera from the list.Knowledge Base
- Enter the following details:
- Username: Your camera account username.
- Password: Your camera account password.
- IP Address: The IP address you noted earlier.
- Click Next and follow the prompts to complete the setup.
5. Configure Camera Settings in iSpy
How to Connect Dahua CCTV Camera to Laptop (Windows)
Via Router (Network)
- Connect camera and laptop to the same router.
- Download Dahua ConfigTool to find the camera’s IP.
- Open browser → enter camera IP (e.g.,
192.168.1.108).
- Login (default: admin/admin).
- View live feed and manage settings.
Shop for dahua CCTV Cameras from Mygss.pk
How to Connect Hikvision CCTV Camera to Laptop (Windows)
Method 1: Via Router (LAN/Wi-Fi)
- Connect camera and laptop to the same router (via LAN or Wi-Fi).
- Download and run SADP Tool to find the camera IP.
- Activate the camera (if first time) by setting a password.
- Change IP to match your network (e.g.,
192.168.1.xxx).
- Open browser → enter camera IP.
- Login (default:
admin / password you set).
- Install plugin if prompted → view live feed.
Method 2: Direct Connection (No Router)
- Connect camera to laptop via Ethernet cable.
- Set laptop IP to
192.168.1.100, subnet 255.255.255.0.
- Run SADP Tool to detect and set camera IP (e.g.,
192.168.1.108).
- Access via browser → enter camera IP → login → live view.
Shop for Hikvison CCTV Cameras from Mygss.pk


 Lenovo LP40 Pro TWS Earphones Wireless Bluetooth 5.1
Original price was: ₨ 3,000.₨ 2,799Current price is: ₨ 2,799.
Lenovo LP40 Pro TWS Earphones Wireless Bluetooth 5.1
Original price was: ₨ 3,000.₨ 2,799Current price is: ₨ 2,799.
 SX8 TYPE-C/IPHONE DUAL PROFESSIONAL LAVALIER WIRELESS MICROPHONE
Original price was: ₨ 5,000.₨ 3,800Current price is: ₨ 3,800.
SX8 TYPE-C/IPHONE DUAL PROFESSIONAL LAVALIER WIRELESS MICROPHONE
Original price was: ₨ 5,000.₨ 3,800Current price is: ₨ 3,800.
 Super Scanner MD-3003B1 Hand Held Metal Detectors, Portable Light-Weight Security Scanner
Original price was: ₨ 6,999.₨ 4,999Current price is: ₨ 4,999.
Super Scanner MD-3003B1 Hand Held Metal Detectors, Portable Light-Weight Security Scanner
Original price was: ₨ 6,999.₨ 4,999Current price is: ₨ 4,999.